






| Here is a complete guide for Mega Man X. Choose the tab you want in order to view its content. |

|
Release Date: Japan: 1993 USA: 1993 Europe: 1994 |
Developer: Capcom |
|
Systems: Super Nintendo PC |
Genre: Action |
 Intro:
Mega Man X begins a new and exciting saga on the Super Nintendo, set many years
after the original Mega Man series. Stunningly detailed graphics, sound and
game play enhance the experience, freshly starting up the series before the
lead-up to the Maverick Wars. New characters, weapons and features ensure the
success of the series for years to come.
Game
Specs:
You'll be taking control of Mega Man X, directing him through the eight stages
to confront and defeat Sigma's eight Maverick leaders. New weapons, item and
power ups will be available, including special weapons gained from defeated
bosses, as well as special heart tanks hidden throughout each stage that can
increase X's overall life energy. The control structure as very similar to the
original series, this time instead of sliding X can perform a dash. Special
armor upgrades await X, each one will give him a special enhancement for a part
of his body, each one is very important and can greatly assist you. Zero will
appear at special points in the game, offering his advice to X. Challenging
game play makes the first game of the series a real hit, paving the way for the
huge storyline ahead.

Mega Man X (SNES-US)
Front Cover


Intro
Stage:
Basically a warm-up
for the rest of the game, this stage should be fairly easy. Dispatch
your first few enemies through frequent charging of your X-Buster.
Before long, you'll find your real threat; a large bee robot. Keep
charging your Buster and firing to take it down. A mid-range charge
of the Buster is enough to destroy the walker robots that it drops
toward you. Eventually it will be destroyed, and you can climb up
the wall leading toward the rest of the stage. You'll have one more
bee encounter as you progress, but it can be taken down in the same
manner. After a bit, you'll reach the stage "boss," Vile. He's
impossible to beat. You can fight if you'd like to, but it won't do
any good. Eventually he'll prevail and a story sequence will save
you.
Stage
Changes:
Some stages change
their appearance as a result of visiting another stage. Here are the
stages that effect each other:
1.
Defeating Chill Penguin before entering Flame Mammoth's stage cools down
the lava, making it safe to walk on.
2.
Defeating Launch Octopus before entering Sting Chameleon's stage fills a
pit with water, allowing access to a Heart tank.
3.
Defeating Storm Eagle before entering Spark Mandrill's stage powers out
the electricity, making it darker, but removing the floor hazards.
Zero's Arm
Cannon:
If you neglect to pick up
the Arm Upgrade, you still obtain it through slightly different means. After
Zero self-destructs on Vile, while he is talking to X, he offers X his Arm
Cannon. Through this, X gets the same effect of the Arm Cannon upgrade.
![]()
Mega Man X:
X was the first reploid created by Dr Light in the year 20XX. X is the first
robot who could think for himself and was the first of his kind to have
feelings and emotions. Dr Light had feared that the world may need a new
champion, and so he created X. Once uncovered by Dr Cain thirty years after
X was in the capsule, he was amazed at X's capabilities and so he began to
create a new race of robots - the Reploids. Unfortunately, some of these new
reploids went "maverick" for some unknown reason and began to threat the
existence of the human race. X feels that it is up to him to rid the world
of the Mavericks and bring peace to both humans and reploids.
![]()
Zero:
Zero's origins are unknown and his current status is the new leader of the
Maverick Hunters. He joined up with X and they became fast friends and
partners. Zero has confidence in X and can see X to be a powerful warrior
against the Mavericks. He helps X out during the game.
![]()
Dr Light:
Dr Light is the
creator of X. His true reasons as to why he made X is unknown, but it is
known that he could not live until the day that X's capabilities and
reliability could be confirmed. Dr Cain was the first to discover Dr Light's
work and continued it. During the game, X will find special power up
capsules where a holographic image of Dr Light will give X a new ability.
![]()
Vile:
Vile is Sigma's top
lieutenant and a robot built specifically for war. He commands Sigma's army
of Mavericks and is almost as big a threat as Sigma. He knows X and Zero are
after him, but is confident that he will not lose to them. X will meet Vile
more than once during the game.

Sigma:
Sigma is the leader
of the Maverick army. He was originally designed to be the leader of the
Maverick Hunters and seemed immune to whatever caused the robots to become
maverick, but unfortunately something happened to him and he took many of
the Maverick Hunters to follow his army. He believed that the humans were
inferior and should be destroyed. His ultimate plan was to build an entire
civilization of Mavericks and began a new age without humans. Sigma is X and
Zero's primary target, as without him the Mavericks would fall apart.
![]()
Chill Penguin:
Guide: His main
attack will be a dash and slide attack, where he will slide across the floor
attempting to slam into X. Often he will fire ice blocks at you and will
sometimes blow out cold air which freezes X if it hits him. Chill will then
jump up to the ceiling and pull on a lever which will cause a huge blizzard
and will blow X against the wall, causing damage. To defeat Chill Penguin,
use the Fire Wave and stay close to him as you fire, because the Fire Wave
doesn't shoot very far. If Chill breaks free of the attack it means he will
perform his sliding attack again, so jump out of the way before he hits you.
Continue this and he won't survive much longer. If you run out of energy for
the Fire Wave, use the X-Buster to finish him off.
Weakness:
Fire Wave.
Weapon Received:
Shotgun Ice.

Storm Eagle:
Guide: You will
find Storm Eagle on board the Maverick's ship. He will often use wind
attacks against you, including his storm tornado gun which can be avoided by
jumping over or dashing through. He will also often flap his wings which
will cause X to move back. Make sure you don't fall off the ship by dashing
toward the Eagle and firing at him all the time. He will occasionally fly up
into the air and spit out an egg in which four bird-like creatures will
hatch from and fly towards X. If he flies right up out of the screen, wait
for a whooshing sound and then dash in one direction as he will swoop down
out of the sky and try to hit X. His weakness is the Chameleon Sting but you
can also use the X-Buster to defeat Storm Eagle.
Weakness:
Chameleon Sting.
Weapon
Received:
Storm Tornado.

Flame Mammoth:
Guide: When
you meet Flame Mammoth, you'll notice that there is a long conveyer belt
below you. When the battle begins, he will use several attacks against you,
such as shooting fire balls at you and trying to jump and crush you. When he
jumps, just before he lands jump up as the impact he makes with the ground
can cause X to lose his footing for a few seconds. When Flame roars, the
conveyer belt will change direction. If he fires out an oil slick and hits
it with fire, it will ignite and you'll have to dodge the flames. His
weakness is the Storm Tornado, but you can just use the X-Buster and
continue charging your weapon and firing at him. If he corners you, jump up
the wall and wait for the right moment to jump off.
Weakness:
Storm Tornado.
Weapon
Received:
Fire Wave.

Sting Chameleon:
Guide: Sting
Chameleon can be very difficult if you don't have the Boomerang Cutter. He
will appear out of the wall and attack. He will often jump down and shoot
his long tongue out which causes heavy damage if it hits you. If he jumps up
and hangs from the roof with his tongue, he will shake and spikes will drop
from the roof. He will also climb up the wall and whip three projectiles out
at X. If he disappears into the wall, you should still be able to see him as
he moves around and appears somewhere else. To defeat him, use the Boomerang
Cutter when he is hanging from the roof and climbing around on the wall.
This weapon should cause a lot of damage to Sting and you should defeat him
fairly quickly.
Weakness:
Boomerang Cutter.
Weapon
Received:
Chameleon Sting.

Spark Mandrill:
Guide: When
you face Spark Mandrill, he will probably charge and try to punch you. He
will use this attack often, so be careful. He will also often fire out large
spark spheres which fly out across the floor and up the walls and can cause
heavy damage. His charges can also cause major damage. If he jumps to the
top of the screen, he'll climb across the roof and drop down when you're
under him, so be ready to dodge him as he falls. If you have the Shotgun
Ice, this boss should be fairly easy to beat. When he charges at you, fire
once and he will freeze for a few seconds. Wait for him to break out of the
ice, and then fire again. Keep doing this until he runs out energy.
Weakness:
Shotgun Ice.
Weapon
Received:
Electric Spark..
![]()
Armored Armadillo:
Guide: For
the best results, make sure you have the Electric Spark when you battle
Armored Armadillo. His main attack is a rolling attack in which he will fly
across the room and bounce off the walls in an attempt to crush X. He will
also often fire energy beams out of his forehead. You will find that if you
shoot him with the X-Buster, he will block most of your shots with his
shield. You can still defeat him this way, but if you use the Electric
Spark, he will be electrocuted and his shield will fall off, leaving him
open for attack. Continue shooting him with the Electric Spark while dodging
his energy beams and you will eventually defeat him.
Weakness:
Electric Spark.
Weapon
Received:
Rolling Shield.

Launch Octopus:
Guide: When
you encounter Launch Octopus, he will use one of his tentacles to taunt you
with. He will then begin to fire several missiles out of his tentacles which
will home in on X. He will also sometimes shoot out larger missiles which
will fly across the screen. Occasionally he will jump up to the top of the
screen and create a huge whirlpool in an effort to suck X into the vortex.
Try to stay out of contact with Launch, as he can grab you and sap energy
away, refilling his own energy. To defeat him, hit him with the Rolling
Shield when he is on the ground before he fires any missiles. If you run out
of the Rolling Shield, use the X-Buster.
Weakness:
Rolling Shield.
Weapon
Received:
Homing Torpedo.

Boomer Kuwanger:
Guide: When you
find Boomer Kuwanger, he will teleport into the room. You will notice that
during the battle he will often teleport around the room to try and appear
near X. He will often fire out a boomerang cutter and tries to grab you now
and then. If he charges at X and grabs him with his horns, he will throw X
up to the roof and cause damage to him. Try to jump out of Boomer's way when
this happens. To defeat him, use the Homing Torpedo and wait for Boomer to
start moving again before firing another shot.
Weakness:
Homing Torpedo.
Weapon
Received:
Boomerang Cutter.
![]()
Vile:
Guide: When you
face Vile for the second time he will have captured Zero and is holding
him in an energy tube. Make sure that when you enter Sigma's Fortress
that you have all the special power ups like the helmet and the armor,
as you'll definitely need them here. When Vile attacks you in his
armored carrier you will find that again you can't defeat him. When you
run out of energy, Zero will break free and destroy Vile's armored
carrier, sacrificing himself to allow X to destroy Vile. You will then
regain your energy, as now Vile will be open for attack. He will fly
around the screen and shoot a spark ball down at X. If the ball hits
you, you won't be able to move and Vile will fire a few missiles which
will hit X and cause damage. He will also often shoot energy beams at
you and dash across the screen. To defeat him, use the Homing Torpedo,
as it will cause massive damage to Vile and destroy him in no time.
Weakness:
Homing Torpedo.

The Spider:
Guide: After
the battle with Vile, the next new boss will be a large mechanical
spider. It will remain at the top of the screen most of the time, and
you will notice before it attacks, several horizontal lines will slide
across in the background and join together the parallel vertical poles.
These poles indicate a path the spider can take to try to climb down and
slam into X. It will also often spit out an egg in which four small
spiders hatch and crawl across the screen. When the spider reaches the
bottom, a large red eye will open on its back. Use the Shotgun Ice for
the quickest way to defeat him. This is the only way you can damage it,
but repeat the sequence and it should be defeated fairly quickly.
Weakness:
Shotgun Ice.
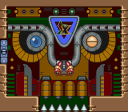
Rangda Bangda:
Guide: This
boss is unusual, as it is the entire wall of the room. It will attack by
opening one of its eyes and the eye will attack. If the eye is blue, it
will fly towards you and try to hit you. If it is green it will not move
but will fire energy balls at you. If it is red it will fly at you while
firing. When the walls move closer together to line up with the spikes
on the ground, the "nose" of the face will move around the screen and
try to hit X. Try to avoid landing on the spikes. To defeat it, use the
Chameleon Sting on the eyes and the nose, and eventually after
destroying each of the parts, the nose will be left. When you destroy
the nose, the machine will explode.
Weakness:
Chameleon Sting.

The Tank:
Guide: This
boss can be difficult at times, as its attacks cause a lot of damage.
First, the upper and lower parts of it will split apart and the lower
part will slide across the screen and try to squash X against the wall.
The upper part will often drop down when you jump onto the top of the
lower part to try to flatten you. Try to avoid this as it causes major
damage. The other major attack is a huge energy ball. The two parts will
move to the right side of the screen and line up with each other. Green
energy beams with flow through the gap between them and a huge energy
ball will fly out towards you. To avoid it, just as it fires dash
forward and it should miss you. To defeat this boss, use the Boomerang
Cutter on the upper part of the boss. Keep firing at the "skull" face
and wait for it to stop flashing after each shot before firing again.
Keep firing, and it should be destroyed quickly.
Weakness:
Boomerang Cutter.
![]()
Sigma's Pet:
Guide: Sigma's
dog (a.k.a Velgauder) will jump around the screen and charge at you
often. It will also occasionally shoot out a fire wave at you and ice
beams. Try to avoid the dog as it runs and jumps around. To defeat it,
use the Shotgun Ice. Each blast won't freeze it like it did with Spark
Mandrill, so you can continue shooting it when it stops flashing. After
a few shots it should explode.
Weakness:
Shotgun Ice.

Sigma:
Guide: Sigma is
very difficult, as he can cause massive damage to X. Once you defeat his
dog, he will fight you using what looks like a light saber from Star
Wars. When he attacks, he will charge at you swinging his sword. If he
hits you about a third of your health will disappear, so you must make
sure that you have four full sub tanks before fighting him. He will
often jump across the room off the walls and charge into you. To defeat
him, use the Electric Spark. You will find that if you shoot at him when
he's standing still, he'll block your shots. Jump up the wall and charge
your weapon to full power. When he jumps up the walls and is opposite
you, release the Electric Spark and you'll shoot out two spark walls
which will fly through him and cause a lot of damage. Drop to the ground
before he hits you and continue the process until you destroy him. If
you are low on health do not hesitate to use a sub tank.
Weakness:
Electric Spark.
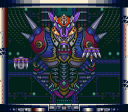
Sigma's Final Form:
Guide: When
you destroy Sigma, his head will appear at the bottom of the screen and
rise up into the head of a huge machine which is set into the wall. This
final form of Sigma is very difficult to destroy. First, its attacks
include the head of the machine firing a huge Fire Wave across the
screen which causes huge damage if it hits you. Avoid it by standing
directly under the head and then moving away from the direction the Fire
Wave moves. The head will also fire out Electric balls which also cause
huge damage. Dodge them by dashing through the gaps between each ball.
The two floating claws next to the machine will often shoot energy beams
above and below themselves. To defeat the boss, wait for a claw to open
and shoot energy beams. If it opens again straight after closing from an
attack, it will fly down to X and try to hit him. There are two weapons
which can damage Sigma. The fully charged X-Buster will inflict a little
damage, but a normal shot of the Rolling Shield will inflict more
damage. Jump on top of the claw and make sure you have charged your
X-Buster to full power or have the Rolling Shield ready. As it rises
back to its original position, jump off it and fire your weapon onto
Sigma's head. You will have to do this several times. Keep dodging
Sigma's attacks and repeat the process, but remember to use sub tanks if
your energy is low.
Weakness:
Rolling Shield.
CONGRATULATIONS!!!
You finished Mega Man X.
Armor
Parts locations:
![]() Leg Upgrade -
Allow X to dash -
Found in chill penguin's stage.
Leg Upgrade -
Allow X to dash -
Found in chill penguin's stage.
 The leg upgrade is the
easiest to find. In the Chill Penguin stage, you will eventually come across
the capsule pictured here and receive the upgrade. The leg will allow X to
perform a dash to enable him to move faster or jump over longer distances.
![]() Arm Upgrade -
Allow X to fire a more
powerful X-Buster shot - Found in Flame Mammoth's stage.
Arm Upgrade -
Allow X to fire a more
powerful X-Buster shot - Found in Flame Mammoth's stage.
 The X-Buster upgrade is
found in Flame Mammoth's stage. You will need the helmet upgrade to reach
this one. When you reach the area where all the platforms are with the
enemies who throw axes at you, go to the start of this area and you should
see some exposed blocks overhead. Dash and jump to the left off the platform
and try to grab onto the blocks. When you make it, jump off the blocks and X
will begin to break them. Keep jumping up and you will find a small room
with the capsule. The X-Buster upgrade will allow X to charge up his weapon
even higher than normal which will release a huge energy blast. This upgrade
will also allow him to charge up the special weapons as well.
![]() Body
Upgrade - Raise X defense - Found
in Sting Chameleon's stage.
Body
Upgrade - Raise X defense - Found
in Sting Chameleon's stage.
 The Armor upgrade is
found in Sting Chameleon's stage. When you reach the large cave, dash and
jump off the edge of the platform before the cave and jump up onto the top
of the cave. You will find a small open area above where you will fight a
mini-boss. Shoot the boss in its head with the X-Buster and make sure you
stay away from it as if you are too close, it will shoot out one of its arms
to try and grab X. Once you destroy it the capsule will appear. The Armor
upgrade will allow X to become much more protected against attacks, as
damage inflicted to him will reduce by half.
![]() Helmet Upgrade -
Allow X to break certain bricks - Found in Storm Eagle's stage.
Helmet Upgrade -
Allow X to break certain bricks - Found in Storm Eagle's stage.
 The helmet upgrade is
found in Storm Eagle's stage. After the long open area with the moving
platforms that you have to jump across, there will be a high metal wall.
Jump up to the top and jump down the other side of it. Jump up to a ledge
where there are fuel tanks and destroy them. Continue on and you will find
the capsule. The helmet upgrade will allow X to break some blocks above him
with a head butt.
Heart
Tanks locations:
Heart Tank -
Increase the energy bar -
Found in all 8 stages.

The first heart can be found in Chill Penguin's stage after you have defeated Flame Mammoth. As you proceed in the level, you will find an armored suit that X can use. When you reach a wall which the suit can't jump over, leave the suit and continue. Once out in the open, jump up to the platform above the area where you used the suit. Go left, and using the Fire Wave weapon, destroy the second igloo-shaped building and the heart will reveal itself.

The second heart is in Flame Mammoth's stage. You may have seen it as it is in clear view, but when the fire is still around you can't reach it. Once you defeat Chill Penguin, the fire will disappear from this level and you will be able to walk underneath the platform and find the energy heart.

The third heart is in Spark Mandrill's stage. As you come to a ladder in a corner which leads down to the rest of the level, if you jump up the wall you will see this heart sitting on a small ledge. There are two ways to reach this heart. You can use the Boomerang Cutter to reach it, or if you jump off the wall using the boots and jumping from the right spot, you can jump around and grab on to the edge of the platform to reach the heart.

The fourth heart is in Armored Armadillo's stage. When you drop down a long shaft, you will land behind the large bulldozer-type enemy, who will charge forward and break down the rock walls in front of it until it falls into the spikes. To find the heart, you must destroy the bulldozer before it reaches the area where the heart is, otherwise it will destroy the wall and you won't be able to reach it. Once you destroy it, jump up the wall to find the heart.

The fifth heart is in Storm Eagle's stage. At the start of the level you will climb up platforms which move on their own. When you reach the highest one, as it reaches the top-left corner of its path, dash and jump to the left into the open air, and you will land on a large platform just above where the level started. The heart will be waiting for you there.

The sixth heart is in Launch Octopus' stage. As you proceed in the level you will find a machine that fires up a whirlpool underwater which can push X up to the surface of the water. The second one you find will push you up to the surface and you will see a large green submarine on the surface to the right. Jump on it and shoot at the small glass window. When the sub explodes, it will fall and destroy the spikes below you, continue on and you will find a large serpent creature below the one you usually have to fight. Destroy it by shooting its tail or head and you will find this heart.

The seventh heart is in Boomer Kuwanger's stage. When you come outside and climb up the side of the tower, once at the top you will see this heart on a platform above you which is out of reach. To get this heart, after defeating Boomer Kuwanger re-enter the stage and use the Boomerang Cutter to retrieve the heart.

The eighth heart is in
Sting Chameleon's stage. When you exit the forest and find a large cave
where all the rocks fall from the ceiling, you will notice a large hole in
the ground just at the entrance to the cave. Slide down the left wall of the
hole and the screen will move down revealing another area underground. You
will see a rock wall on the right which can be destroyed by jumping off the
blocks of the wall. Once you destroy the wall, stand on the platform where
the wall was and dash and jump to the right. Don't worry about falling into
the hole, as the water will allow X to jump further and you will land on a
platform with the heart on it.
Sub-Tank
locations:
Sub-Tank
-
Stores health - Found in
Spark Mandrill's, Armored Armadillo's, Storm Eagle's and Flame Mammoth's
stages.

The first sub-tank is in Flame Mammoth's stage. Once you have the boots upgrade, jump up to the highest platform where all the enemies throw axes at X. Once at the top platform you will find an extra life. Dash and jump off the left side of the platform and you will land on the wall where the tank is concealed. Destroy the blocks covering it by jumping off them and then take the sub-tank.

The second sub-tank is in Armored Armadillo's stage. When you drop down a hole and the bulldozer starts to pursue you, keep going until it falls into the spikes and explodes. Go back to where it began its rampage and there will be a sub-tank waiting there.

The third sub-tank is in Storm Eagle's stage. When you reach the large area where there are moving platforms with gun turrets on them, there will be a large platform above the area where some platforms will lead to. Shoot open the window and take the sub-tank from the platform.

The fourth sub-tank is in Spark Mandrill's stage. You may have seen this one before, but you couldn't reach it before. It is found near the start of the level. When you climb up the first ladder, climb down the next one and keep going forward and you should find it. To get the tank you will need the Boomerang Cutter. Stand near the wall and fire, but you might need to fire while falling from a jump so that the projectile fires downward and reaches the tank.
![]()
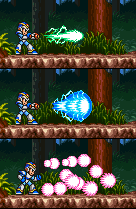
X-Buster:
The X-Buster is the standard weapon of the game and you begin the game with
it. Firing a normal shot is a small energy ball which causes a small amount
of damage to enemies. When the X-Buster is charged up to its first level, a
stronger green energy beam will fire out causing more damage to targets. The
second stage is a large blue beam that causes more damage. The third stage
can only be reached when the weapon upgrade power up is found. It fires off
huge purple beams which cause maximum damage from the X-Buster.
![]()
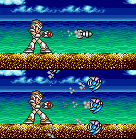
Homing Torpedo:
The Homing Torpedo
weapon is gained after you defeat Launch Octopus. The primary fire of this
weapon will fire out a single missile which with fly off and home in on an
enemy target, destroying it or damaging it once contact is made. The
secondary fire will shoot out six larger missiles and will spray them out in
front of X to strike any targets in front of him.
![]()
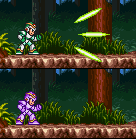
Chameleon Sting:
The Chameleon Sting
weapon is gained once you defeat Sting Chameleon. The primary fire of this
weapon will shoot out three green beams, two of which fire out at diagonals
to X and the middle one will fire straight ahead. The secondary fire will
cause X to flash, indicating that he can walk through enemies for a limited
time without taking damage.
![]()
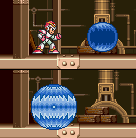
Rolling Shield:
The Rolling Shield
is gained after you defeat Armored Armadillo. The primary fire of this
weapon shoots out a large blue ball that bounces across the screen until it
hits a target. If it hits a wall, it will reflect off it and continue on in
the opposite direction. The charged-up state will create a defensive shield
around X. This will protect him against any enemies who try to strike X.
Energy projectiles will be deflected, but if a strong solid object strikes
the shield it will turn off.
![]()
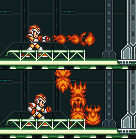
Fire Wave:
The Fire Wave
weapon is gained when Flame Mammoth is defeated. The weapon's primary fire
is a short-range burst of fire which can smolder targets. The charged up
stage of the Fire Wave releases large flame walls which fly forward,
striking any targets in the way.
![]()
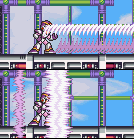
Storm Tornado:
The Storm Tornado
weapon is gained once you defeat Storm Eagle. This weapon's primary fire
will shoot out a long gust of wind which can strike through targets and
cause more damage than a regular shot. The blast will either completely
destroy the target or damage it and blow it further away from X. The
charge-up fire will create a huge swirling vortex of wind around X and will
destroy any targets above or below him.
![]()
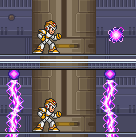
Electric Spark:
The Electric Spark
weapon is gained once you defeat Spark Mandrill. The weapon's primary fire
will shoot out an electric spark-ball which can damage or electrocute
targets. The charged state of this weapon will fire out two giant walls of
electricity either side of X and can destroy any targets they strike
through.
![]()
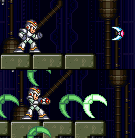
Boomerang Cutter:
The Boomerang
Cutter weapon is gained when Boomer Kuwanger is defeated. The primary fire
will shoot out a boomerang that will disappear once it hits a target or it
will fly out in a circular fashion and return to X. This can be used to
retrieve items out of reach. The secondary fire will fire out eight large
boomerang-shaped projectiles in diagonal directions from X.
![]()
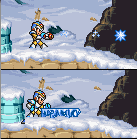
Shotgun Ice:
The Shotgun Ice
weapon is gained after you defeat Chill Penguin. This weapon's primary fire
is an ice block which can either damage targets or sometimes freeze enemies.
If the block hits an obstacle such as a wall, the block will break and
smaller projectiles will reflect back off the wall. The charged state of the
weapon creates a platform which X can ride. Once the platform is created it
will slide forward for a limited time.
|
1 |
7 |
6 |
4 |
Bosses defeated: None |
|
1 |
4 |
8 |
8 |
Energy
hearts: 0 |
|
7 |
7 |
4 |
8 |
Body Upgrades: None |
|
4 |
3 |
6 |
8 |
Bosses defeated: Flame Mammoth |
|
7 |
8 |
5 |
8 |
Energy
hearts: 0 |
|
3 |
8 |
7 |
4 |
Body Upgrades: None |
|
8 |
2 |
1 |
4 |
Bosses defeated: Flame Mammoth, Chill Penguin |
|
8 |
5 |
2 |
7 |
Energy
hearts: 1 |
|
6 |
6 |
4 |
6 |
Body Upgrades: Leg |
|
3 |
8 |
5 |
5 |
Bosses defeated: Flame Mammoth, Chill Penguin, Spark Mandrill |
|
7 |
1 |
3 |
2 |
Energy
hearts: 3 |
|
5 |
3 |
6 |
8 |
Body Upgrades: Leg |
|
7 |
5 |
5 |
3 |
Bosses defeated: Flame Mammoth, Chill Penguin, Spark Mandrill, Armored Armadillo, Storm Eagle |
|
8 |
5 |
7 |
2 |
Energy
hearts: 5 |
|
7 |
4 |
3 |
4 |
Body Upgrades: Leg, Helmet |
|
3 |
4 |
4 |
7 |
Bosses defeated: Flame Mammoth, Chill Penguin, Spark Mandrill, Armored Armadillo, Storm Eagle, Launch Octopus |
|
2 |
8 |
6 |
7 |
Energy
hearts: 6 |
|
4 |
2 |
2 |
6 |
Body Upgrades: Leg, Helmet, X-Buster |
|
7 |
6 |
5 |
6 |
Bosses defeated: Flame Mammoth, Chill Penguin, Spark Mandrill, Armored Armadillo, Storm Eagle, Launch Octopus, Boomer Kuwanger |
|
2 |
6 |
8 |
2 |
Energy
hearts: 6 |
|
3 |
1 |
7 |
8 |
Body Upgrades: Leg, Helmet, X-Buster |
|
7 |
4 |
3 |
1 |
Bosses defeated: Flame Mammoth, Chill Penguin, Spark Mandrill, Armored Armadillo, Storm Eagle, Launch Octopus, Boomer Kuwanger, Sting Chameleon |
|
3 |
8 |
5 |
2 |
Energy
hearts: 8 |
|
8 |
5 |
2 |
1 |
Body Upgrades: Leg, Helmet, X-Buster, Armor |
![]()

"Haduken" Fireball:
Fans of Capcom's Street Fighter series recognize the term "Haduken,"
while the rest of the world simply calls it a fireball. No matter what
it is, it's powerful. To get it, you must have collected all the
power-ups (that means 8 Heart tanks, 4 Sub-tanks, and 4 capsule
upgrades) and have beaten all 8 Maverick bosses. Once this is
accomplished, go through Armored Armadillo's stage without dying. At the
end of the stage, when the wheeled cart goes flying over the large pit,
jump off of it and onto a ledge. Collect the energy at the top, and then
go to where you would be fighting Armored Armadillo, and X will leave.
Go back into Armored Armadillo's stage and repeat this 4 to 6 times
without dying. Eventually, there will be a new capsule where the energy
once stood on the ledge, and he will give you the ability to use the
Haduken. To do this, follow the motion you would follow in a Street
Fighter game. Down, Down-Left, Left, Y, all in one smooth motion. Note:
Lefts are exchangeable for Rights, depending on which way you're facing.